Monthly Archives: November 2013

The Facts About The Blood Type Diet – PositiveMed

The Facts About The Blood Type Diet

We had a request here at PositiveMed to inform about this particular diet, so here it is:

The Blood Type Diet is a nutritional diet advocated by Peter D’Adamo, the premise of this diet being that your blood type determines the food and exercise you need to be healthy. Food is divided into 3 categories 1)Highly beneficial 2)Neutral and 3)Avoid. Type 1 foods work as medicine, Type 2 work as food, and Type 3 are toxic to that person.

The blood types O, A, B, and AB determine your diet and exercise personality according to D’Adamo, Type O is the hunter, you should have vigorous exercise and a high protein diet. Type A is the agrarian, which is a more vegetarian diet with gentle exercise. Type B is the nomad, the only type that can eat dairy, should have moderate exercise. Type AB is the enigma, mixture of A and B with calming exercise.

Dr. D’Adamo works out of the Center of Excellence in Generative Medicine at the University of Bridgeport in Connecticut. He has written several books and teaches classes out of the Center, called COE, he is an expert at naturopathic and integrative medicine.

The problem with this diet program, according to many experts, is that there is no scientific evidence to support these claims, many of the claims he has made for many years state studies in progress but these studies have not been published and others are unable to duplicate results. David W. Grotto, RD, LD, stated the beliefs are “very obscure and lacking in science.” Most reputable physicians and dietitians do not advocate any diet plan which leaves out any of the food groups, proper nutrition requires a balance of many nutrients.

via The Facts About The Blood Type Diet – PositiveMed.

7 Signs You’re Being Used – PositiveMed

7 Signs You’re Being Used

7 Signs You’re Being Used

Edited By Stephanie Dawson

We come in contact with many people in our daily lives. Some of them become our friends, unfortunately some will pretend to be your friend to fulfil their selfish needs. Some people only talk to you because they think you might be of help to them. It’s easy to identify these people, you may want to consider getting rid of them. A list of 7 signs you are being used by a friend and its time to dump this friendship:

1. You only hear from your friend when they need something

The biggest sign that indicates a fake friendship is that your friend will only contact you when he/she needs something. It can be anything, something tangible like a book, car, or dress, or a favor like giving them a ride, or doing something for them. You should help your friends with things, but if someone calls you when he/she needs something its time to say goodbye.

2. Making plans with your friends without you

If you introduced your friend to other members of your circle and that friend started making plans with them without you, it can be a sign that your selfish friend is using you in another way. If this happens once overlook it, if its happening frequently it shows the friendship is becoming toxic. Frequent plans without you may pull your other friends away from you.

3. Betrayal

Trust is the most basic thing required for any relationship to flourish, friendship is no exception. If your friend is using your personal information to make personal gains it means that he/she is betraying you and is not trustworthy. It may be gossiping about you and disclosing your secrets or flirting with the object of your affections.

7 Signs You're Being Used

4. You are constantly told NO

We all have expectations from our friends and count on them. If you are doing everything you should do as a friend and not getting anything when you are in need and only hearing the word No its another sign of fake friendship. It may not be when you need something, maybe you’re calling them to hangout with you. Not getting your friend when you need them is an indication of something wrong.

5. Your friend pressures you

In any friendship things should be decided mutually. If your friend is frequently pressuring you to do things they want and do not care what you want, its time to sever the friendship. Everything that happens in a friendship should involve mutual consent and there should be no coercion.

6. Lies

If your friend is lying to you even about small things like going to a movie or borrowing a book its another indication of a toxic friendship. Its better to be honest and say something you don’t want to hear than lying and saying something that pleases us.

7. You get invited at the last minute, if at all

If your friend is inviting you to join them for various activities at the last minute knowing it will be hard for you to join the invitation is just a formality.

What is Your Acne Telling You? – PositiveMed

What is Your Acne Telling You?

What is Your Acne Telling You?

Sometimes we think the problem behind our acne is a hormonal imbalance, but this can’t be true every time. Our faces depict our emotions and our health. Some doctors can diagnose a problem by looking at your face because of face mapping. Face mapping can be a key to every mysterious problem behind your skin and body. Its a popular method in skin care by focusing on the different areas of your face.

Acne can indicate many things about your health. What does it mean when it happens to occur on:

1. Forehead: Start drinking water as soon as you notice acne on your forehead, its caused by poor digestion due to toxins and lack of water. Drinking water will help you flush out the toxins. You need have at least 8 large glasses of water each day and avoid fizzy and caffeinated drinks. Take care of your diet, try herbal tea, especially green tea.

2. T-Zone: This is the area between your eyebrows linked with your nose. Since your nose is linked to your liver, acne here indicates unhealthy functioning of your liver.

3. Around Your Eyes: The area around your eyes indicates the health of your kidneys. Anything that occurs around your eyes including dark circles indicates improper function of your kidneys and dehydration. Drink more water to avoid this.

What is Your Acne Telling You?

4. Cheeks: Cheeks are divided into two parts, upper and lower. The upper cheek is connected to your lungs, acne here happens when you breathe in polluted environment or smoke. If you are in a polluted area this area is more likely to get affected by dirt and filth. Use of mobile phones can be harmful as it secretes dirt onto your face and clogs pores. Change your pillowcase every week and try to avoid sleeping on the affected side. Eat more kale, sprouts, and pumpkin.

Lower cheek indicates poor dental hygiene. If you are having any problems in your mouth, especially in the gums this will be clearly visible. Keep your teeth healthy by brushing regularly and flossing your teeth. Avoid fizzy drinks and sugary products.

5. Nose: Your nose is connected to your heart. A swollen or bulbous nose is an indication of high blood pressure. If you have this type of nose avoid energy drinks. Reduce intake of salt and start eating more fruits and vegetables.

What is Your Acne Telling You? Poster

6. Ears: Ears are linked to kidneys, you might have breakouts on your ears if your body lacks water. Avoid excess salt and caffeine.

7. Chin: Your chin is linked to the small intestine. Your diet causes breakouts here. Avoid dairy products and oily foods. Acne on your chin shows that you are not eating a healthy diet, add more fruits and vegetables and eliminate unhealthy food.

via What is Your Acne Telling You? – PositiveMed.

10 Exercises for Building Muscles Without Using Weights! – PositiveMed

10 Exercises for Building Muscles Without Using Weights!

10 Exercises for Building Muscles Without Using Weights!

By Positivemed-Team

Edited By: Stephanie Dawson

• Body Weight Push-Ups

Push-ups are a great exercise performed using body weight. Not only can you do push-ups with various hand positions but it can be done from an elevated surface. Push-ups are touted as one of the best exercises around the globe and involve effective movement of several body muscles.

• Body Weight Squats

Squats are an indicator of ankle, hip, and thoracic mobility. You can perform squats against the wall to improve proficiency and technique. They are effective in enhancing the muscles of your legs.

• Bulgarian Split Squats

These split squats increase leg strength and build muscle and help hip and knee mobility. You do not need to go to the gym to perform them and they can easily be performed anywhere.

• Crunches

Few people have the stamina and patience to stick to crunches, they are deemed most effective among the many exercises that help you build muscular mass in and around the waist. Running and cardio need to be combined, but defining the abs or simply flattening the stomach is best achieved by crunches.

• Pull-Ups

The presence of a gym trainer or any kind of equipment is not required for this exercise, do them at least twice a week. Its the most basic training exercise that helps to maximize your back, neck, and arms. Keep doing this until you reach the stage of muscle fatigue and cannot lift yourself again.

10 Exercises for Building Muscles (Without Using Weights!)

• Single-leg rising dead-lift

Use the position you use to do a stationary lunge then begin the movement until you are halfway through the typical lunge movement, get back to starting position then proceed to complete the full lunge motion to complete one set.

• Ring dips

It requires a good deal of strength to do anything on the rings (other than just hanging) and dips are no exception. Because of the instability and free motion of the rings performing dips on rings or blast straps forces the body to work harder and the shoulder is kept healthier as they aren’t forced into a certain static position as in when dips are performed on dip bars.

• Inverted row

This is a great back exercise that can be varied. If you need to make it easier bend your knees and keep your back locked. Keep your legs straight for a more difficult variation. Row your body up to the bar/rings and make sure your elbows stay tight.

• Ring/bar bicep curl

These directly hammer your biceps and make them work in a way you just can’t achieve with dumbbells. Use an underhand grip, take the same position you did when performing the bodyweight triceps extension. Lean back so you are hanging under the bar/rings. Keep your elbows up high, core locked, and curl your body towards your hands. At the top of this movement you want your hands to be in front of your eyes.

• Rope climbs

If you do them from an L-sit position or minimize leg use it helps build muscle. Visited (53774) times!

via 10 Exercises for Building Muscles Without Using Weights! – PositiveMed.

Video: She Played No Games: Female Student Has A Breakdown During A Blue-Eye Vs Brown Eye Experiment About About Racism & Discrimination!

She Played No Games: Female Student Has A Breakdown During A Blue-Eye Vs Brown Eye Experiment About About Racism & Discrimination!

Description: Brown Eye-Blue Eye Experiment

via Video: She Played No Games: Female Student Has A Breakdown During A Blue-Eye Vs Brown Eye Experiment About About Racism & Discrimination!.

10 Ways to Take Stunning Portraits – Digital Photography School

10 Tips for Taking Stunning Portraits

How do you take Portraits that have the ‘Wow’ factor?

Today and tomorrow I want to talk about taking Portraits that are a little out of the box. You see it’s all very well and good to have a portrait that follows all the rules – but it hit me as I was surfing on Flickr today that often the most striking portraits are those that break all the rules.

I want to look at some ways to break out of the mold and take striking portraits by breaking (or at least bending) the rules and adding a little randomness into your portrait photography. I’ll share ten of these tips today and a further ten tomorrow (update: you can see the 2nd part here).

1. Alter Your Perspective

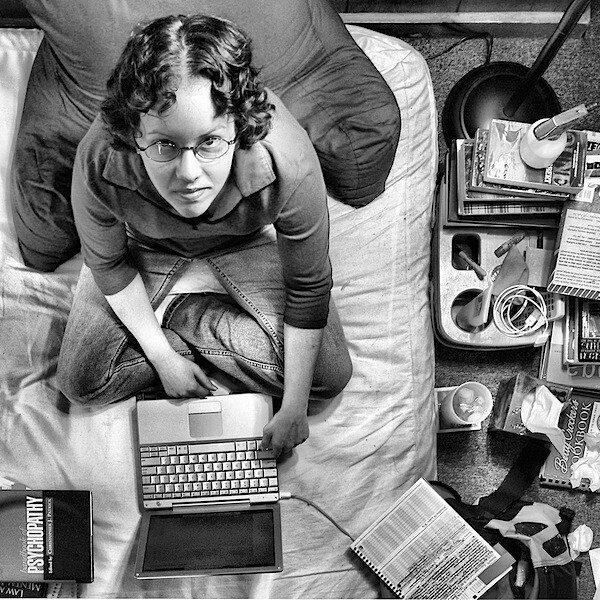
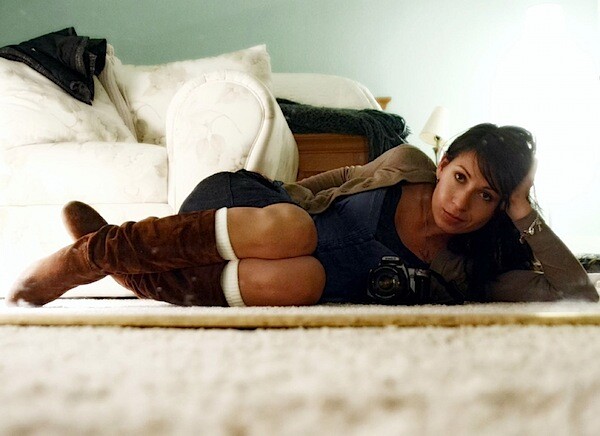
Most portraits are taken with the camera at (or around) the eye level of the subject. While this is good common sense – completely changing the angle that you shoot from can give your portrait a real WOW factor.


10 Ways to Take Stunning PortraitsPhoto by striatic


Get up high and shoot down on your subject or get as close to the ground as you can and shoot up. Either way you’ll be seeing your subject from an angle that is bound to create interest.


10 Ways to Take Stunning PortraitsPhoto by TeeRish

2. Play with Eye Contact

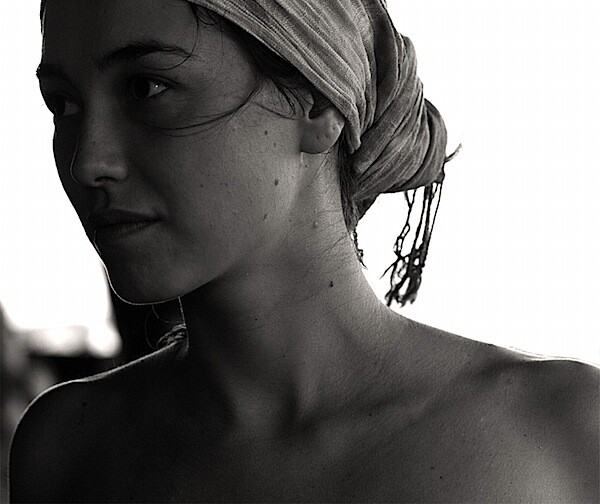
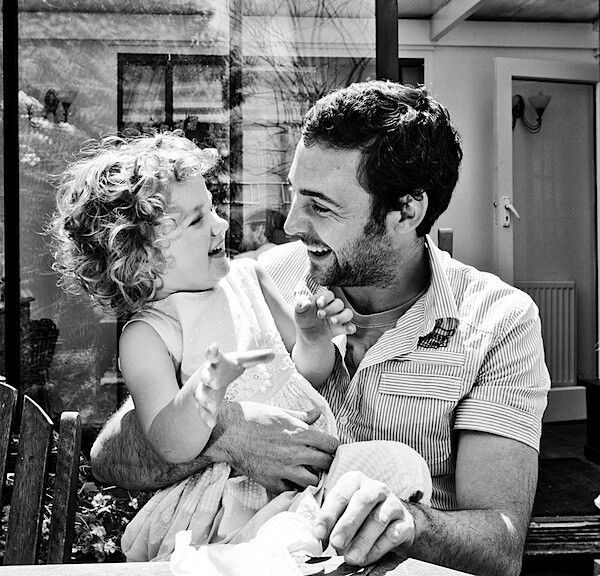
It is amazing how much the direction of your subject’s eyes can impact an image. Most portraits have the subject looking down the lens – something that can create a real sense of connection between a subject and those viewing the image. But there are a couple of other things to try:

A. Looking off camera – have your subject focus their attention on something unseen and outside the field of view of your camera. This can create a feeling of candidness and also create a little intrigue and interest as the viewer of the shot wonders what they are looking at. This intrigue is particularly drawn about when the subject is showing some kind of emotion (ie ‘what’s making them laugh?’ or ‘what is making them look surprised?’). Just be aware that when you have a subject looking out of frame that you can also draw the eye of the viewer of the shot to the edge of the image also – taking them away from the point of interest in your shot – the subject.


10 Ways to Take Stunning PortraitsPhoto by monicutza80

B. Looking within the frame – alternatively you could have your subject looking at something (or someone) within the frame. A child looking at a ball, a woman looking at her new baby, a man looking hungrily at a big plate of pasta…. When you give your subject something to look at that is inside the frame you create a second point of interest and a relationship between it and your primary subject. It also helps create ‘story’ within the image.


10 Ways to Take Stunning PortraitsPhoto by paulbence

3. Break the Rules of Composition

There are a lot of ‘rules’ out there when it comes to composition and I’ve always had a love hate relationship with them. My theory is that while they are useful to know and employ that they are also useful to know so you can purposely break them – as this can lead to eye catching results.

The Rule of Thirds is one that can be effective to break – placing your subject either dead centre can sometimes create a powerful image – or even creative placement with your subject right on the edge of a shot can sometimes create interesting images.


Another ‘rule’ that we often talk about in portrait photography is to give your subject room to look into. This can work really well – but again, sometimes rules are made to be broken.


10 Ways to Take Stunning PortraitsPhoto by Bukutgirl

4. Experiment with Lighting

Another element of randomness that you can introduce to your portraits is the way that you light them. There are almost unlimited possibilities when it comes to using light in portraits.

Side-lighting can create mood, backlighting and silhouetting your subject to hide their features can be powerful.


portrait-lighting.jpgPhoto by Bukutgirl

Using techniques like slow synch flash can create an impressive wow factor.

Portrait-Slow-Sync-Flash Photo by diskomethod

5. Move Your Subject Out of their Comfort Zone

I was chatting with a photographer recently who told me about a corporate portrait shoot that he had done with a business man at his home. They’d taken a lot of head and shoulder shots, shots at his desk, shots in front of framed degrees and other ‘corporate’ type images. They had all turned out fairly standard – but there was nothing that really stood out from the crowd.

The photographer and the subject agreed that there were plenty of useable shots but they wanted to create something ‘special’ and out of the box. The photographer suggested they try some ‘jumping’ shots. The subject was a little hesitant at first but stepped out into the uncomfortable zone and dressed in his suit and tie started jumping!

The shots were amazing, surprising and quite funny. The shoot culminated with the subject jumping in his pool for one last image!

While this might all sound a little ‘silly’ the shots ended up being featured in a magazine spread about the subject. It was the series of out of the box images that convinced the magazine he was someone that they’d want to feature.


portrait-comfort-zone.jpgImage by TeeRish

6. Shoot Candidly

Sometimes posed shots can look somewhat…. posed. Some people don’t look good in a posed environment and so switching to a candid type approach can work.

Photograph your subject at work, with family or doing something that they love. This will put them more at ease and you can end up getting some special shots with them reacting naturally to the situation that they are in. You might even want to grab a longer zoom lens to take you out of their immediate zone and get really paparazzi with them.

I find that this can particularly work when photographing children.


portrait-candid.jpgPhoto by phitar

7. Introduce a Prop

Add a prop of some kind into your shots and you create another point of interest that can enhance your shot.

Yes you might run the risk of taking too much focus away from your main subject but you could also really add a sense of story and place to the image that takes it in a new direction and gives the person you’re photographing an extra layer of depth that they wouldn’t have had without the prop.


portrait-prop.jpgPhoto by Mrs. Maze

8. Focus Upon One Body Part – Get Close Up

Get a lens with a long focal length attached to your camera – or get right in close so that you can just photograph a part of your subject. Photographing a person’s hands, eyes, mouth or even just their lower body… can leave a lot to the imagination of the viewer of an image.

Sometimes it’s what is left out of an image that says more than what is included.


portrait-close up.jpgPhoto by Bukutgirl

9. Obscure Part of your Subject

A variation on the idea of zooming in on one part of the body is to obscure parts of your portrait subject’s face or body. You can do this with clothing, objects, their hands or just by framing part of them out of the image.

Doing this means that you leave a little to the imagination of the image’s viewer but also focus their attention on parts of your subject that you want them to be focused upon.


portrait-obscure.jpgPhoto by BigBlonde

10. Take a Series of Shots

Switch your camera into ‘burst’ or ‘continuous shooting’ mode and fire off more than one shot at a time.

In doing this you create a series of images that could be presented together instead of just one static image.

This technique can work very well when you’re photographing children – or really any active subject that is changing their position or pose in quick succession.


portrait-continuous shooting.jpgImage by diyosa

10 More ways to Take Great Portraits – Continued Tomorrow

Tomorrow I will complete this mini-series of posts on portrait photography with 10 more techniques like the ones above. Make sure you’re subscribed to Digital Photography School to ensure you get the second half!

Update: You can read the 2nd half of this series at 10 More Tips for Stunning Portrait Photography. Also check out What the Mona Lisa Can Teach You About Taking Great Portraits for a portraits tutorial with a difference.

Also – don’t forget the portrait section of our forum – an ideal place to discuss portrait photography and show off some of your work.

ISO Settings in Digital Photography – Digital Photography School

Grant (a reader of DPS) asks – ‘I’m confused about ISO. What is the best setting to choose? Should I always choose the lowest one?’

Thanks for the question Grant. Before I attempt to answer it let me give a quick definition of ISO:

What is ISO?

In traditional (film) photography ISO (or ASA) was the indication of how sensitive a film was to light. It was measured in numbers (you’ve probably seen them on films – 100, 200, 400, 800 etc). The lower the number the lower the sensitivity of the film and the finer the grain in the shots you’re taking.

In Digital Photography ISO measures the sensitivity of the image sensor. The same principles apply as in film photography – the lower the number the less sensitive your camera is to light and the finer the grain.

Higher ISO settings are generally used in darker situations to get faster shutter speeds. For example an indoor sports event when you want to freeze the action in lower light. However the higher the ISO you choose the noisier shots you will get. I’ll illustrate this below with two enlargements of shots that I just took – the one on the left is taken at 100 ISO and the one of the right at 3200 ISO (click to enlarge to see the full effect).

ISO

(you can see larger sized images of both shots here for the 100 ISO and here for the 3200 ISO)

100 ISO is generally accepted as ‘normal’ and will give you lovely crisp shots (little noise/grain).

Most people tend to keep their digital cameras in ‘Auto Mode’ where the camera selects the appropriate ISO setting depending upon the conditions you’re shooting in (it will try to keep it as low as possible) but most cameras also give you the opportunity to select your own ISO also.

When you do override your camera and choose a specific ISO you’ll notice that it impacts the aperture and shutter speed needed for a well exposed shot. For example – if you bumped your ISO up from 100 to 400 you’ll notice that you can shoot at higher shutter speeds and/or smaller apertures.

Questions to Ask When Choosing ISO

When choosing the ISO setting I generally ask myself the following four questions:

Light – Is the subject well lit?

Grain – Do I want a grainy shot or one without noise?

Tripod – Am I using a tripod?

Moving Subject – Is my subject moving or stationary?

If there is plenty of light, I want little grain, I’m using a tripod and my subject is stationary I will generally use a pretty low ISO rating.

If it’s dark, I purposely want grain, I don’t have a tripod and/or my subject is moving I might consider increasing the ISO as it will enable me to shoot with a faster shutter speed and still expose the shot well.

Of course the trade off of this increase in ISO will be noisier shots.

Situations where you might need to push ISO to higher settings include:

Indoor Sports Events – where your subject is moving fast yet you may have limited light available.

Concerts – also low in light and often ‘no-flash’ zones

Art Galleries, Churches etc- many galleries have rules against using a flash and of course being indoors are not well lit.

Birthday Parties – blowing out the candles in a dark room can give you a nice moody shot which would be ruined by a bright flash. Increasing the ISO can help capture the scene.

ISO is an important aspect of digital photography to have an understanding of if you want to gain more control of your digital camera. Experiment with different settings and how they impact your images today – particularly learn more about Aperture and Shutter Speed which with ISO are a part of the Exposure Triangle.

via ISO Settings in Digital Photography – Digital Photography School.