Monthly Archives: July 2013

The 10 Laws Of Success: An Independent Artist’s Hip Hop Guide | Rappers Talk Hip Hop Beef & Old School Hip Hop | HipHop DX

The 10 Laws Of Success: An Independent Artist’s Hip Hop Guide

posted July 26, 2013 at 10:20AM EDT | 2 comments

The 10 Laws Of Success: An Independent Artist's Hip Hop Guide

A panel of industry veterans including LEP Bogus Boys and Torae weigh in on how to launch an independent Hip Hop career.

With all due respect to Eminem and 50 Cent, sometimes people watch movies like 8 Mile and Get Rich Or Die Tryin’ and assume launching a Hip Hop career works the same way they see in movies. I meet a lot of unsigned, aspiring rappers. Between assisting in HipHopDX’s social media and marketing duties and working with Coast2CoastLive.com, I’m at well over 250 events each year. And since Hip Hop is still a multi-billion dollar industry, one of the most common questions I run across is how an artist can get their music posted online in hopes of launching a successful career. We’re doing 13 or 14 cities, and I also host four to six online showcases monthly, so those questions get asked pretty often. Luckily, I also encounter plenty of A&R’s, executives, signed artists and producers who have established themselves within the industry.

So the following advice comes from those professionals—people like Ken Lewis (check the production credits of J. Cole’s, Kanye West and Jay-Z’s latest albums, and you’ll see his name). When rappers hope to get posted on various Hip Hop blogs and websites, these are ultimately the people they hope to impress and work with. So we put together this list based on Robert Greene’s The 48 Laws Of Power. It’s geared to getting your stuff online or just an overall balance of how to be successful as an independent artist trying to get signed.

This isn’t some guaranteed guide on how you’re gonna get on. But between industry veterans like J-Hatch, LEP Bogus Boys, DJ ill Will and Torae, there are over 100 combined years of experience in this roundtable. For what it’s worth, I used to manage an OfficeMax before getting involved with DX, Coast2Coast and i-Standard Producers. I had to make the decision between taking a pay cut and keeping the same job, or taking my unemployment and severance pay to leave and pursue my passion. So I can relate to any aspiring artist out there with a stack of burned CDs in pursuit of their dream. Taking the advice from the industry vets you hope to someday work with—along with some planning, hard work and some luck—is a start.

Law 1: Do Your Research

Eric Beasley: Co-Owner of The world’s largest MC Battle League, SMACK/ URL and one of the largest Hip Hop YouTube channels online www.youtube.com/Theurltv. Beasley has also worked as an artist and producer manager in addition to his time at Warner as an A&R.

“Making the transition from your mother’s basement to Madison Square Garden can be extremely difficult in this current climate of the music business. Most labels won’t take a chance on an artist—especially a rapper without any traction. When I say traction, I mean trackable data about you or your brand. This data can be in the form of BDS [Broadcast Data Systems] or Mediabase radio spins, a huge buzz on a mixtape (thousands of on-line downloads, independent sales, or write ups and praise from notable publications) presence on key websites and blogs, significant views on YouTube with a music video or blogs, touring, endorsement from established artists etc. Many ask how this can be achieved when the competition has more money, contacts, management, etc. Getting signed or becoming a huge independent artist takes a plan!”

Law 2: Use Resources & Strategize

Riggs Morales: VP of A&R and Artist Development at Atlantic Records. For more music education insight, visit www.Itsriggdup.com

“Drive: This is the trait is what will keep you moving forward as doubt sets in, as progress is made or as you reach those ‘stand-still’ moments when nothing is happening.

“Creativity: The ability to stand out from the rest starts here. Even if you find yourself in a place clogged by others pursuing the same thing you are (producing, singing, rapping), you should nurture the ability to create something that sets you apart from everyone and will help you stand out.

“Resources: Learn to work with less to get more. You can do just as much with a three people as you can with a 1,000, if it’s all you have to work with. Learning to work with bare essentials will push you to make the best with what you have.

“Strategize: Once you’ve built a cohesive system with what you have, then it’s important to utilize the little you have with a strategic approach. Make every small step count towards bigger steps.

“Vision: Have a clear (and realistic) outline of where you want to be and what you think will take to get there. Know that it will not happen overnight. It will take you time as you develop a rhythm through trial and error, which will ultimately trim the fat off your artistry and unveil the artist you were meant to be.

“Get A Job: You will make no money as you work on your craft, which can lead to a stressful state of mind and interfere with your creative rhythms. Get a job that allows you to pay bills and put food on your table until your ‘passionate hobby’ turns into ‘paying occupation.’”

Law 3: Create Quality Product

Ken Lewis: Multi-Platinum Producer for Kanye West, Jay-Z, Eminem, Drake, Usher, Danity Kane, Jeremih, 50 Cent. More info on Lewis and his online musical tutorial program is available via www.AudioSchoolOnline.com.

“The number one thing young artists forget is that it’s really all about the music. If your song doesn’t instantly and strongly connect to people who don’t know you, you’re not going to make it very far. Don’t listen to your friends and relatives. They love you and want to see you win. Watch the reactions to your music from people you don’t know. Don’t tell me, ‘Well this rapper got signed and his songs suck.’ Really? Is that where you set the bar for yourself? If you want to get noticed, make or find hot beats, and write an undeniable hit. Then do it again, and again, and you’ll get a deal. If it was easy, everybody would do it. It’s not easy, and it takes a ton of thankless, draining, work, coupled with tons of rejection and soul searching. But there are a few who will emerge every year to the top.”

Law 4: Master The Art Of Multi-tasking

L.E.P. Bogus Boys: Blueprint/Infared/Interscope Recording Artists. Follow Count and Moonie via Twitter at @LEPBOGUSBOYS.

“What you got to understand is that whether you’re independent or signed, it all falls on you. So you have to have an immediate team that multitasks and know their roles. We only got a team of five including us, and we all make the mechanism work. When you sign, look for a label that understands your brand not just because they got a lot of money for you. You also gotta build your relationships and stay persistent. That’s how we got so far—because of our immediate outlets of people we can get to. It took a whole lot to build that so strong, but it worked. More than anything, you gotta have good product and challenge yourself to be great.”

Law 5: Value Your Independence

DJ ill Will: CEO of Tha Alumni Music Group & Manager for Kid Ink. Ill Will has worked with and broke some of the hottest artists in the game including Soulja Boy, Chris Brown, Tyga and more.

“No offense to the major labels, but stay Indie and get your paper up before you even consider a major label deal. Trust me, you won’t regret it! Putting yourself at the mercy of a major label is career suicide…unless you’re the rare few.

Law 6: Develop An Identity & A Team

Brian “Z” Zisook: VP/Editor-in-Chief of DJBooth.net

“There are no hard and fast rules or stone cold lock advice that works universally when given to an aspiring artist, who is looking to escape from the confines of their mother’s basement and make it as a professional recording artist. There are, however, several steps that should be taken to ensure that you are giving yourself the best possible chance at future success. These steps include, but are certainly not limited to: finding a team of professionals who believe in you and your music, developing an identity as an artist and branding your stage name and music accordingly, and creating a product that will sell itself.”

Law 7: Be Humble, Realistic & Work Hard

Kyle “KP” Reilly: VP Idle Media Inc / DatPiff.com  

“For an artist to have a chance to make it out their mama’s basement and into a label’s boardroom, a lot of things need to happen, including a bit of luck. For the most part, what an artist needs more than anything is a good, realistic head on their shoulders. If your head isn’t right, you have an inflated perception of yourself or of the game, you wont make it very far. Be humble, be yourself and don’t follow everyone else’s or industry trends. Work harder and harder for yourself—not just to talk about how hard you’re working—results will speak for themselves. And lastly, do not spam or annoy those who you are attempting to sell yourself or distribute your music to.”

Law 8: Maintain A Physical Presence

J-Hatch: Co-CEO of I-Standard Producers. www.IstandardProducers.com

“These days, the general perception is that you need an online presence. Many aspiring artists then take to their social networks to send links out to people who in most cases consider that spamming. In reality it’s all about creating a balance—yes the Internet is important and influential. But networking, performing and building a fan base are all equally as important.”

Law 9: Become Business Savvy

Nick Hiersche: President of Coast2Coast Mixtapes & Coast2Coast Live. coast2coastmixtapes.com & coast2coastlive.com

“I think the number one misconception we get is they think others owe them because they made a song. Just because you made a song does not make it a venue’s responsibility to pay you all of a sudden. In order to get a paid booking, you must be able to sell tickets, alcohol or some other type of product for that venue or company. Music business is a business, and you must invest in yourself and your business until revenue starts being generated. If you are not getting paid to perform or feature on tracks, then you have not invested enough in yourself, period. The indie route is a smart route and can be done on a small budget, but it is still a budget. Until you realize this and make smart investments into your ‘music business,’ then it is a hobby, not a business.

The converse of that is that if you want a ‘major record deal,’ you must invest hundreds of thousands of dollars into your ‘music business.’ It takes that much investment for large returns to come in, which is the only thing that interests labels. So both ways cost time, money and of course effort and talent. But in today’s market you don’t really need the major label. You can generate a sufficient income by investing in your indie ‘music business’ until the revenue starts coming. And then you can just collect from the loyal fans you gained from investing!”

Law 10: Maintain Consistency

Torae: Emcee, Founder of Internal Affairs Entertainment, A&R for Soulspazm Records, co-host of Siriux XM’s “Rap Is Outta Control.” www.facebook.com/itstorae – Twitter & Instagram @Torae

“I think the most important thing in today’s market is to be visible. It doesn’t matter if you make the best music in the world if no one hears it or no one knows. So you have to be visible—seen and heard. Do a lot of shows, even if they’re free shows…even if only your family is there. Perform your music. Master it, get it air tight and record it. YouTube has birthed a number of sensations, so definitely have it uploaded and linkable there. You also have to get used to giving away music for free. There is so much competition now, in order for people to know your music, you’re going to have to give some away to build an audience and fan base. Social networking is very important as well. Make sure you’re active on Facebook, Twitter, Instagram etc. The more people are into you and what you’re doing, the more they’ll care about the music, and the more they’ll spread the word.

“I did a docu-series last year called ‘Off The Record.’ I think all new and aspiring artists should check it out to get some insight on the ups and downs of the music business. It was filmed during the recording and release of my album For The Record. I did it so that I could shed some light on what it takes on the daily basis to grind out a career in music.”

Michael Trampe is a Social Media & Marketing guru from Philadelphia, PA. He owns MAAD Management & also works with Coast2CoastLive and I-Standard Producers. Prior to joining HipHopDX in 2007, Trampe has been a DJ, owned and operated a recording studio, managed producers and artists, worked promotions for TDE (Top Dawg Entertainment). You can follow him on twitter @MicVicious, Facebook and YouTube.

Charles Barnes Resume

Contact
Charles Barnes
424 Stoll Poole ct
Lexington Ky, 40508
(606) 571-6052
(859)213-6152
http://rickys.clanteam.com
andro140@gmail.com
Skype: Wrecky-Bobby

Summary
My skills and experiences include: Adobe Photoshop, Html Editor, Print Advertising, Print Design, Web Content Development, Html Design, Graphic Design, Graphic Art, Logo Design, Photography, Desktop Publishing.

I will complete my Associates degree in Graphic Design from BCTC in 2015.

Experience

Frisch’s Big Boy Restaurant                                                      01/2006 – 06/2007
891
North Main Street, Nicholasville, KY
Daniel Stokes (859) 881-8015

  •  I was a cashier, dishwasher, cook and salad bar attendant.

Colomer USA                                                                           07/2007 – 09/2008
5344 Overmyer Drive Jacksonville FL 32254
Robert Short (904) 693-1200

  • I was a plastic assembly line worker. I also stacked pallets for shipping.

Amazon.com                                                                           10/2008 – 01/2009
1850 Mercer Road Lexington, KY 40511
Mike Hall (859) 381-0818

  • I did general warehouse duties during peek season. I piled pallets, sorted, picked until I was trained as a forklift driver. I remained a forklift operator until I left for training.

Army National Guard                                                               03/2008 – 07/2010
50 Stonecrest Court
Shelbyville, KY 40065
Connell Rodriguez (502) 633-7804

  • I was a computer operator maintainer and soldier for the Kentucky guard.

Denny’s                                                                                   07/2010 – 05/25/2013
1880 Newtown Pike 
Lexington, KY 40511
Debbie Peterson (859) 233-1874

  • I started as a service assistant than I trained in trained in all other areas of the restaurant. I mainly cooked but my duties included stocking cleaning rotating food prepping and counting inventory.

Wal-Mart Supercenter                                                              07/2010 – 12/2012
500 W New Circle Road
 Lexington, KY 40511
Stephen Bel (859) 381-9370

  • Trained in customer service, stocking and receiving and HAZMAT clean up.

Androcity                                                                                01/2002 – 01/2010

  • I created a Friday comic strip and web mastered androcity.com. I created all the graphics, HTML and installed the forums and a content management script using MYSQL and PHP coding. It was a Photoshop heavy site using nothing but HTML and CSS built in Notepad.
  • http://www.androcity.com (archive)


Shadowseen Studios                                                                  02/2010 – 02/2013

  • Here I made everything from illustrations to website banner ads. This was my personal website I had for the sole purpose of sharpening my skills. I used to test PHP CSS and MYSQL scripts and codes on this site weekly. It was also for art, music and animation.
  • http://www.shadowseen.com (closed)


Ricky Digital Graphic Design                                            06/22/2013 – Current

Education

Full Sail University                                                                   2011 – 2012

I’m a current student at Full Sail University in the online graphic design bachelors program. I work on a lot of logos magazine articles and web pages. The classes are online and the work is real world based with strict timelines and realistic projects.

Bluegrass Community and Technical College                            2013 – Currently

Currently rescheduled for classes

Earle C. Clements Job Corps                                                    2008 – 2009

I studied computer repair and graphic design for a year and got a solid grounding in print. This is where I learned about non-web based graphics and desktop publishing.

Skills

Adobe Photoshop, Adobe Illustrator, Html Editor, Adobe Dreamweaver, Adobe Suite, Print Advertising, Print Design, Web Content Development, Html Design, Graphic Design, Graphic Art, Logo Design, Photography, Desktop Publishing,adobe, Dreamweaver, English, html, illustrator, web site production.


I have skills in both web and print styles. I use the Adobe Suite for all my work and I’ve worked with it enough to replicate anything just by looking at it. I know Photoshop best of all out of the suite having used the program since childhood. I have experience in web design and HTML coding, web marketing and ad placement. I currently work on personal and academic projects while doing commissions that may improve my skill and portfolio.

I also have skill in computer service repair and an excellent understanding of electronics. I can also do print work and manual labor.

Some examples of my work can be found on my Deviantart portfolio page. http://andro140.devianrtart.com


Outsourcing Platforms Compared – oDesk vs Elance vs Freelancer vs 99designs

With a combined workforce of over 14 million freelancers, 11 million jobs and $1.8 billion in cumulative freelancer earnings – oDesk, Elance, Freelancer and 99 Designs are the 4 biggest outsourcing platforms today. This cool infographic by TimeDoctor compares these 4 major players on several different parameters, providing interesting information if you’re interested in the online outsourcing space.


odesk-elance-freelancer-99designs-compared


Freelancers: 3 reasons why you are not getting any assignments. | Easily Project

Freelancers: 3 reasons why you are not getting any assignments.

1 Reply

So, you want to do freelancing? That’s great. You went out and tried to bid for freelance jobs in online portals, but jobs were hard to come by. It is not happening. So you are wondering, what happened? Here are some reasons why you are not getting jobs, and some tips to get more jobs.

1. You are offering the same service as everyone else

Everyone is claiming to be an expert in HTML, CSS, Javascript, Photoshop. Everyone is claiming to be hard working, committed and dedicated. Everyone has a degree and working experiences. When a client posts a job and receive bids, all the bids look the same. In order to get jobs, you need to think of how you are different from the others. What can you offer to the client that other freelancers are not able to offer? In business, this is called unique value proposition. Products that are the same with others are commodities, and can’t command a high price. Products that are different, unique and special will attract interest. Now, the product is you. Everyone is unique and different. You may possess the same skills with others, but you may have different experiences and greater passion for your area of specialty than others. If you are a translator and are knowledgeable about business, instead of offering a general translation service, you can position yourself as an expert translator for businesses. If you are a software developer who have worked in the retail field before & understand how retail businesses work, you can position yourself as a software developer with industry knowledge in retail. As long as you are different in a good way, your differentiation will attract prospective clients that need your specialized skill or knowledge.

2. You are not speaking your clients’ language

You need to speak in language that your prospective clients wants to hear. I am not talking about English, Spanish or Hindi. You need to speak in terms of benefits. Freelancers often make the mistake of emphasizing too much on their skills. You need to help your potential customers understand how your skills will benefit them. If you are a web designer, don’t just stop at telling your customers that you are good at HTML and CSS. You need to inform your customers, on how he will benefit if he uses your design. You can tell your customers how he will have lower bounce rate or more page views because of your design. Focus on the benefits. Your skills are means of obtaining the benefits.

3. You are a stranger

People like to work with people whom they know and can trust. Unfortunately, there are bad freelancers out there and our potential clients may have experienced previous disappointments. They will be very guarded and careful in hiring. It is not easy to earn trust. Referrals by word of mouth is the best way to grow your business. Let people around you know that you are doing freelancing. Share it in Facebook. News will get around and jobs will come knocking at your door. Easily Project is a new and innovative way to find customers through friends’ endorsements. Do check it out at http://ow.ly/mx0NZ

With these tips, I hope that you can find more freelancing jobs. Be different, speak benefit and spread the word around.

via Freelancers: 3 reasons why you are not getting any assignments. | Easily Project.

photoshop tutorials Transparent gifs with colored mattes

1

Make sure you have your image on its own layer with no background.

This is the #1 mistake people make, in older versions of Photoshop you would have saved it on a colored background


2

Now go File>Save for web

You should see this box open.


3

Make your setting gif and use the smallest amount of colors you can without affecting the appearance of the image.

The 2 things to remember here are:

1. Make sure Transparency is selected.

2. Set the Matte color to the closest match of the background color you will be placing the image on. If you are unsure then set the Matte to “None” (more about Matte in step 4)

Click ok and save your image.


4


Some more information on Matte.

Matte puts a thin outline around the image to get rid of what we call halos.

On the right you can see an example of a halo. Look familiar? This is the sign of an amateurish webpage. Believe me there are already enough bad webpages out there without us adding to them. 🙂


5


Here is the same image with Matte set to none. Notice the halo is gone, but it is still a bit jaggy around the edges.


6


Here is the same image, this time saved with a black Matte. Notice how nice and sharp it is?

Always choose a matt color if you can. This way all your transparent gifs will look nice and clean.

This Matt trick will also work with transparent PNGs.

Stay tuned for more 🙂


Texturing Type

Texturing Type

Al Ward, Action Fx Photoshop Actions Resource
http://actionfx.com

Hello Colin and denizens of the PS Café! Sorry for the horrible delay in sending this column/article/tutorial. I could spout a dozen excuses for not posting in awhile, but they all sound weak as I recite them to myself. I do a lot of that. 😉

I’ve been playing with what I consider a pretty incredible feature in Photoshop 6, and thought this week I’d share it with you. This is sort of a companion piece to my article for Planet Photoshop, which should be online June 26.

Photoshop 6 has a very powerful addition to the Layer Styles that is grossly overlooked, but if you are into dynamic typography, interface design or realistic effects for your creations, mastering the Pattern Overlay feature is a must.

The process of creating patterns is fairly simple, and will be covered in depth in the Planet article. Basically you simply find an image you think would be a good texture, define it as a pattern, and then it is yours to apply as needed.

For example (don’t you just love examples?), I’m wading thru endless images on a clipart disk set, wondering what possible use I can get out of 500,000 images. Then I notice… drum roll please… an entire section devoted to industrial photos! Metal sheets, buckets of nails, rust, chrome, you name it. What if I took advantage of my pattern defining tool and applied these images to my designs? Actually I’ve already done this and, as the cool factor turned out to be pretty high, this article was (is being) born.

1

As stated before, the actual process of defining these textures will be covered in another article, but let’s take a look at some effects we can create using this process. I’m starting with simple white type on a black background.

This is just to give our image some contrast… use any background you see fit.
Ok, let’s apply some of my new textures to the type. NOTE: In order to get these patterns, you will have to download them from Action Fx. Here’s the link

2

Ok, once this is loaded into the textures drop down, all you no do is select Texture Overlay from the Layers Palette and select the pattern you would like to use to overlay your design.

Here’s the result just from applying this texture:

Photoshop 6 has made the process so incredibly easy, you will no doubt be creating your own textures in no time. Again, check out the Planet Photoshop article for more info.

3

Hmmm… there must be more we can do to this type though. What about applying more layer styles to the textured image?

First, a bevel:

Duplicate the type layer, and select the original (the one not on top).
Let’s apply a patterned stroke to this layer:

4

Create a new layer beneath this layer, select this layer again and Command/CTRL+E to merge down. Apply another bevel:

5

Now apply a contour to that bevel:

Here’s the result of my little experiment:

6

Just play around with it to get a feel for it. Here’s what I came up with in about a minute:

That’s it for this time around. Come see me at Action Fx!

Al Ward, Action Fx Photoshop Actions Resource
http://actionfx.com

Texturing your way to 3D

1

Let’s talk some more about texturing, this time working with an interface style image over several layers. Photoshop 6 layer styles allow us to do some fantastic effects with patterns, and I want to address some of those effects here. What better way to do that than to show you first hand?

For this example I’ll be using a pattern group you may download free from Action Fx. Here’s the link:
http://actionfx.com/downloads/Textures/AFX-22.zip

Here’s the new image specs:

Width= 8 in
Height= 8 in
150 DPI
RGB
Background= White

This image is going to be large, so I’ll only be displaying the pertinent areas for the examples.

2

First, let’s fill the background with black. Create a new layer and, with the circular marquee tool, create a round selection that takes up most of the image. Fill this selection with 50% gray. Create another smaller selection (circular) inside of the larger circle. We want to make a large ‘O’ with a fairly thick border. Delete the contents of the smaller circle.

3

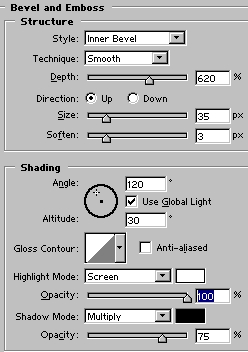
Ok, let’s bevel this puppy. Go to your layer styles, and use settings close to these:

We want a bit more ‘metal’, and rather than tweaking the layer style contours, we will use a good old fashioned curve. Create a new layer beneath this one, select the circle layer and Command/Control+E to merge the 2. Go to Image>Adjust>Curves, and enter something close to this:

5

Here is the result as seen on our beveled circle:

I’ll tell you a little secret. That same curve structure is what all these interface developers are using. What do I mean? Well, let’s see what happens when we apply this to a light gray to dark gray sphere:

6

That was pre-curve. Here’s post-curve:

You may need to tweak it a bit, but the effects are similar.

7

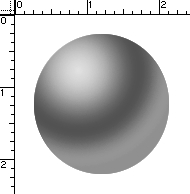
Ok, back to the circle. First, duplicate the circle layer, make the top layer invisible and select the lower layer. After you have downloaded the pattern set, load it into the layer styles and apply the pattern shown in the example to this layer. Here are my settings:

Here’s the effect:

8

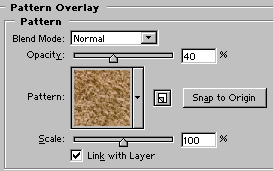
Leave that layer alone for a minute. Select the top layer, and appy another pattern to it, lowering the opacity to about 40%.

9

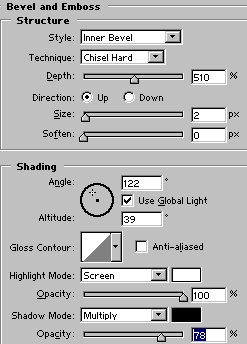
Create a layer beneath this one, select the top layer and again merge down. Using either the magic wand or color selection option, we want to select only portions of this layer.

Once you have your selection, delete it.
Now apply a bevel to this layer. We want to draw out the contrast between the layers, so that it appears some corrosion has occurred on our metallic wheel.

Here’s the result:

That’s really all I have time for this week, but I promise we will continue with the same image next time. What is cool about this is that everything we have done can be incorporated in an action, as well as separate layer styles can be created for the layer effects. We will work on developing this project next time, however. Until then, come see me at Action Fx!

Creating actions of your own

Generating Actions of your Own:
A Quick and Nearly Painless Process!

Al Ward, Action Fx Photoshop Actions Resource
http://actionfx.com

Hello again, and greeting from a frosty Montana! I just returned from the MacWorld Conference in San Francisco, and though I did meet some interesting people I was pointedly reminded why I live in Montana instead of a more populous area. In short, it is very gratifying to be home again.

That brief intro was sort of a disclaimer to explain my tardiness in posting this article, and I really appreciate Colin’s patience with me. This week I’m going to walk through the process I use when developing my text effects actions, step by step, with all the appropriate interjections, sub categories and bylines required to flawlessly create your own. In theory, anyway!

1

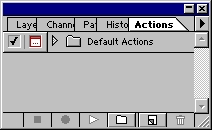
With Photoshop open, hit F9 to bring the Actions Palette to the front. For this tutorial I’m using Photoshop 5, but the process is the same for 6.0 also. After you hit F9, you should see this palette:

The default actions set is visible in the palette… we want to clear that set out of there. So we will open the Actions Menu and clear them out.

2

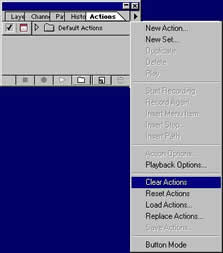
Ok. Now from the menu we can start recording, or we can also press the New Set Icon from the bottom of the palette. All actions must be in a set before you can record. You may then select ‘New Action’ from the menu, or just hit the New Action Icon from the bottom of the palette. Once you hit record you’re in business… every step you make in Photoshop will now become part of the Action provided it is a command that can be recorded. Stick with the commands you can control from the drop down menus and you are in good shape, as not all tools can be recorded. This will save you a few of those pesky error messages when you try rerunning the action later.

3

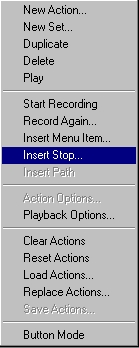
The first thing I do is set up a new image for my text actions. Generally I start with something 9 inches wide, 5 inches high, 72 dpi, RGB, white background.

Immediately after creating this new image I make a layer. This is where I’ll create my ‘foundation’ text. As I distribute these online through my website (http://actionfx.com), other websites and on CDs that I generate of my work, I insert a ‘Stop’ command at this point giving instructions to the user on how to proceed. Before you insert your Stop, you will want to cease recording. You insert a Stop from the Actions Menu:

4

Here is an example of a standard message I use in my actions. Note that I give the user instructions on how to set up their image for the best possible result, including which tool to use, how large a font to enter and so on. I rarely select the ‘Allow Continue’ checkbox to avoid mistakes, as the user will be able to press play to start the action once they have completed the required steps.

5

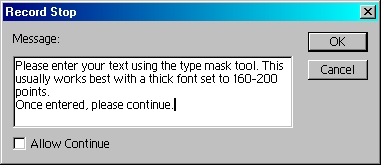
To save a whole lot of time and space, I’m not going to go through the entire process for this effect, as it is simply recording the steps I took to go from this:

to this:

Once you have completed your action, stop recording, select the Set that your action is in, name it and save it from the Actions Menu. You can now distribute your action for all the world to play with, as I’ve done here. If you would like this effect for your very own, I’m sending it with this article. Or if you cannot find the link, email me and I’ll be happy to send it off to you.

Until next time, be safe, take care, and do something cool for someone. Ciao!
Al Ward, Action Fx Photoshop Actions Resource
http://actionfx.com

Download this action here

Photoshop tutorials Rounded Corners

1

Create a new layer, Make a shape, select it and fill with foreground color. Alt/Option delete.


2

Select>save selection name the new channel “shape”

3

Switch to channels Palette and click on the “shape” channel. Cmd/Crtl +D to deselect all


4

Filters>Blur>Gaussian Blur. Use a higher setting for a more pronounced effect or a smaller setting for a more subtle effect.


5


Open the levels box: Cmd/Ctrl +L

This is where the magic happens. Drag the left triangle to the middle, now drag the right one to the center until all 3 arrows are on top of each other. Click ok.


6

Ctrl/Cmd click on the channels thumbnail (1) to turn on the selection. Click on the RGB thumbnail to select all channels (2)

7

Go back to the layers palette. Create new layer (layer 2)
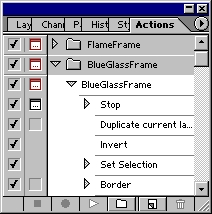


Intro to actions

An Intro to Actions and Photoshop Automation

A couple of years ago, some Action enthusiast friends of mine expressed their concern that I was pursuing a vapor, a ghost, an insubstantial illusion in my quest to promote Actions in Photoshop on a global scale. In short, they told me I was nuts with a capitol CRAZY. We had met through the Action Xchange (http://www.actionxchange.com), an excellent and still hopping online resource for 3rd party freeware actions. I have learned more about Photoshop studying those little .atn files than any other resource available, whether online or print.

Somewhere along the line it came to me that, though a few thousand people were getting into the script exchange, there remained a huge majority of designers that had yet to crack the Actions Code. I set out to change that, and am still working. I developed Action Fx as a place to share what I had learned and created and, thanks to Scott Kelby who has given me a forum in Photoshop User Magazine and the Planet Photoshop website to discuss Actions, a few more find these incredible scripts everyday. It has been a slow, steady process, but finally Actions are starting to receive the recognition they deserve.

Have you tried actions yet? Perhaps you still have some questions as to what the hype is about, or have no idea what I mean by ‘action’. Truth to tell, Adobe has not devoted much documentation to the subject.

Actions are simply a means to record all the commands used to generate an effect in Photoshop for re-application later.

I can hear the ‘Huh?’ already, so I’ll put it like this. Want your text to look like Melted Gold with a wood grain running along the border of the letter? Something like this might take awhile to work out in Photoshop, but if someone has already turned the process into an action, you can apply this effect to your text with ONE CLICK on the Actions Play Button. Photoshop then creates the effect automatically. Now imagine you have to create the headers for 30 different web pages using this same effect. Without actions you would have to walk through the process 30 times, taking hours or days to complete the task. If you had an Action script, you could be done in as little as 30 minutes, maybe sooner! Simply starting the action, typing your text, and hitting play again will create your effect.

 Imagine pages of Flaming Fonts jumping off monitors all over the world… that is what actions can do, but this is only a small example. Photo editing, multiple file processing, hot key assignment for assorted Photoshop commands and a veritable potpourri of other tasks are ‘actionable’.

If you are still scratching your head, don’t fret. I’m going to walk through the process of loading and playing actions, and perhaps offer up a tutorial on creating actions on a later date.

To begin with, you will need an Action. You may download several on my website (http://actionfx.com) or on the Action Xchange. You may also do a search of Photoshop Actions, which will offer up many sites with available downloads.

Don’t worry about hard drive space, as these action files, with the extension .atn, aren’t very large. Usually they range from 7 to 20 k. You may save them anywhere on your computer and load them from there, but it is best for organization purposes to create a sub directory within the Photoshop file tree. Again, this is not vitally important, but it will help you to keep your files in an easy-to-find area. When you have several thousand of these little scripts on your system as I have, it will be a lifesaver!

Once you have downloaded the actions, you will need to open the Actions Palette inside Photoshop. Hit the F9 key or go to Window>Show Actions to bring the palette forward.

In the upper right hand corner of the palette is a small arrow. Click this to open the Actions Menu. Scroll down until you see ‘Load Actions’, find your newly saved actions on your system and select them. Unfortunately you can only install one at a time, but you can load up the palette with numerous actions.

NOTE: Actions, or .atn files ARE CROSS PLATFORM COMPATIBLE. So both PC and Mac users can play together!

There are 2 modes of the Actions Palette: Button Mode and Edit Mode. We toggle between these two states of the palette from the afore mentioned Actions Menu. Button mode will place a button with the action name inside the palette… simply click on this to play the action, and follow any directions as they appear. Edit Mode displays a collapsible tree of all the commands within the action. Select this mode if you want to see what is happening, what filters and settings are being applied, etc. while the action is running. This is a great learning tool! You play the action in this mode by pressing the ‘play’ button along the bottom of the palette.

Here’s a look at the Actions Palette in the 2 modes:

EDIT MODE

Button Mode

To close, I’ll give you a quick example of what actions can do, using an action I created. With a click of the play button,
I can go from this:

to this:

I hope you have enjoyed this little intro to actions! Take care, and come see me at Action Fx soon.

Bye for now!